
Showing posts with label White. Show all posts
Showing posts with label White. Show all posts
Monday, March 9, 2015
Kitchen Renovation Part 6 ~ Counter Tops
Welcome back to our kitchen renovation! We hope you had a great weekend! Although we still have lots and lots and lots of snow, the temperature warmed up a little bit. So maybe spring will be here soon! If you missed our previous posts about our kitchen, you may like to read Kitchen Renovation Part 1, Kitchen Renovation Part 2, Kitchen Renovation Part 3 ~ Putting Up The Walls, Kitchen Renovation Part 4 ~ Our DIY Customized Microwave Cabinet Out Of A Stock Cabinet , and Kitchen Renovation Part 5 ~ Our DIY Furniture Style Cabinets Out Of Stock Cabinets. You will have a much better idea as to where we started and how far we have come with our kitchen renovation. When we had first started planning our kitchen, we were going to purchase beautiful granite counter tops. However, when it came time to actually move forward with our kitchen the granite I had picked out was not really a feasible option. Therefore, we decided to go in another direction. I had seen many great kitchens with butcher block counter tops and loved the contrast between light and dark (I had already planned to use white cabinets with a dark wood floor.), so we decided to make our own wood counter tops. We weren't sure how well they would work out, but thought we would give them a try. There are many tutorials to follow, but we used a combination of these two: The Shabby Creek Cottage and Breakfast For Dinner By Loraine. They were really quite easy to follow.

Wednesday, March 4, 2015
Kitchen Renovation Part 5 ~ Our DIY Furniture Style Cabinets Out of Stock Cabinets
Hi everyone, we hope everyone had a wonderful weekend! Welcome back to our kitchen renovation! If you are new to our blog and have missed our prior posts about our kitchen renovation, you might like to read Kitchen Renovation Part 1, Kitchen Renovation Part 2, Kitchen Renovation Part 3 ~ Putting Up The Walls, and Kitchen Renovation Part 4 ~ Our DIY Customized Microwave Cabinet Out Of A Stock Cabinet. As I mentioned in our previous posts, we were using our kitchen and trying to stay on a budget while renovating. So, although it would have been wonderful to complete everything at one time, we needed to complete our kitchen in stages. When we were planning our kitchen, I did a lot of perusing in magazines, books, and the internet to get an idea as to what would work for our kitchen. I liked the aesthetic as well as the functional aspects of drawer cabinets, as oppose to door cabinets. To get the look and function we wanted without the extra cost, we purchased stock cabinets and painted them white. We loved our new cabinets, but they needed a little extra something. I wanted a built-in look without the expense. When I saw this idea at Cuckoo 4 Design, I knew it was the perfect solution! So, we decided to extend the counter length (we made our own) past the end of the cabinets and add posts to give the base cabinets a furniture style look.

This is how the cabinets looked when we started.
Wednesday, February 25, 2015
Frozen Winter Birthday Party Part 3 ~ The Slumber
Hi everyone! Welcome back to Hailey's frozen winter birthday party! (If you missed our last posts, you may like to read Frozen Winter Birthday Party Part 1 ~ The Preparations and Frozen Winter Birthday Party Part 2 ~ The Food and Dessert Tables.) Since Hailey's birthday party was also a slumber party, we created a frozen, winter, castle/tent for the girls to sleep. And..... since we asked the girls to wear their Frozen pajamas, for her party, we included a "chillin out" theme as part of our frozen winter theme.
First, Chris and Brice hung the bunting from the ceiling.
Next, Chris and I hung the draping on each side of the entryway.
And then, I set up tables and chairs in our office/playroom
for the girls to eat, paint, and play games.

Tuesday, February 24, 2015
Frozen Winter Birthday Party Part 2 ~ The Food and Dessert Tables
Hi everyone! Welcome back to Hailey's frozen winter birthday party! If you missed our last post, you may like to read Frozen Winter Birthday Party Part 1 ~ The Preparations. As I mentioned in our last post, we were ripping up the carpet in our dining room and office which meant that we still needed to put most of our furniture back before Hailey's party. So, we kept her party simple. We ordered her birthday cake from a local bakery and purchased blue punch. Then, I baked cupcakes and cookies and used our bread tubes to make heart shaped bread for peanut butter and jelly sandwiches. I, also, made heart shape ice cream. (I used the same idea I did in Hailey's princess/prince/knight birthday party.) Next, I filled our apothecary jars with candy in blue, white, and silver colors. We used our white dishes to serve cheese sticks, carrots, black olives, and chips. Seriously, the easiest menu I have ever planned!
When I was going through the photos of cakes
the bakery had done previously, I saw this cake done as
a beach theme cake with seashells, etc.
And then, I saw a picture with snowflakes on cookies.
So, I asked if they could do a cake in these blue
colors and add the snowflakes for a frozen winter theme.
I was very pleased when I picked up the cake.
It turned out even better than what I had pictured in my mind.
It was a beautiful cake and tasted great!
(I added the number seven to the top of the cake.)

Monday, February 23, 2015
Frozen Winter Birthday Party Part 1 ~ The Preparations
Hi everyone! We hope you had a wonderful Valentine's Day! We, as usual, had a very busy weekend, but great too. A few weeks ago we hosted Hailey's birthday parties at our home (We hosted a friend birthday party one evening and a family party the next evening). At first, the only requirement she had for her friend party was that she wanted a slumber party. So, we had originally planned a theme party based on one of Hailey's favorite book series and made plans for a slumber party (Hailey's first slumber party). However, Hailey decided she wanted a Frozen slumber party. So..... we created a winter theme party with various shades of blue and white and included stars, sparkly number sevens, and snowballs. We, also, asked the girls to come dressed in their Frozen pajamas to include Hailey's request for a Frozen party and because it was a slumber party. Since her birthday was quickly approaching, we had a limited amount of time to plan and prepare for her party. And of course, right after the holidays, we decided to rip up the carpets in our dining room and office/playroom (which were the rooms we would be using for her parties). (If you are new to our blog, you may like to read Dining Room ~ Putting Up The Walls.) This meant that our whole house was in disarray. We still had Christmas items in the family room, furniture stacked in the parlor, front entry way, and upstairs, and sanders, stain, and sealer in the dining room and office. Our house was an obstacle course. (And just in case you're wondering, we had not intended our floors to be such an involved project.) Therefore, we needed to keep her party fun as well as easy.

Tuesday, February 4, 2014
Valentine's Day Heart Pillow And Sheets
Hi everyone! I have, finally, finished unpacking the boxes (except for the kitchen) and we are knee deep in birthday preparations. But, I wanted to take a minute to share with you these cute Valentine's Day sheets and heart pillow I found at Target.


I don't, usually, do a whole lot of Valentine's Day decorating.
I like to switch out accessories like pillows, throws, and fresh flowers
without having to go overboard with a whole Valentine's Day theme.
I planned it that way. I used a general red, white and snowflake theme
to carry us through winter and right into Valentine's Day.
However, when I saw these
I knew that they would be a wonderful addition
I knew that they would be a wonderful addition
to Hailey's room for Valentine's Day.
The pillow feels like velour and is Hailey's favorite color.
The sheets are a nice cozy, warm, flannel
The pillow feels like velour and is Hailey's favorite color.
The sheets are a nice cozy, warm, flannel
and are perfect for the cold, snowy, winter weather.
Just in time, too! As we get ready for another snow storm coming our way.
Thanks for visiting Our Family Inspired Home!
Friday, December 27, 2013
Christmas Side Porch 2013
I thought I would squeeze in another Christmas post before the end of the year. We love our side porch and because we use our side porch entrance, for now, it's the first thing we see when we come home. So today, I'm sharing our side porch. Not only did I use what we already had from our prior Christmases ( Christmas 2010, Christmas 2011, Christmas 2012), I used basic winter decor so we can use it all through winter. I also, created a little outdoor hot cocoa station while Hailey was enjoying the snow.


She liked making snow angels on her tummy.

And yes even in the snow, swinging is fun.

We hope everyone had a wonderful Christmas!
Thanks for visiting Our Family Inspired Home!
Friday, December 20, 2013
Hot Chocolate Bar
Every night after bathtime and before bedtime I read to Hailey while she has a drink and snack. During the warmer months she has juice, but in the winter it's always hot cocoa. A couple of years ago I saw this Dear Lillie Hot Chocolate Bar (I thought on Pinterest, but for some reason I didn't get it pinned) and have wanted to create one ever since. This year I am super excited that we were able to make our very own hot cocoa bar! We set up our hot cocoa bar on the breakfast bar in our family room and used items we already had on hand.


Yep, that is a sheet hanging in the background
(we have gutted our kitchen and are trying to keep the
dirt and dust to a minimum in the other rooms),
and the bar counter needs to be replaced,
and the trim needs to be painted.....

You can see how we used these apothecary jars for


We posted about our basket and pitcher here, Our Home ~ Autumn 2013.

The pinecone tree we used in our Christmas 2011 decor.
The red Christmas trees, ball ornaments, and pinecones, we used in our Christmas 2012 decor.
And, so far, we have gotten the most use out of the garland during Christmas.

We are loving our hot cocoa bar!

The hot cocoa bar is set up, the Christmas tree is finished in our sunroom, the dining room is almost ready, and the sideporch is looking festive. We are a little bit closer to Christmas!
Thanks for visiting Our Family Inspired Home!
Sunday, December 15, 2013
Christmas 2012
We're back today with more Christmas inspiration! How is your Christmas decorating coming along? If you are still looking for ideas I hope you are able to use some of our ideas to help with your Christmas decorating. In our Christmas 2010 decor we used white, silver, and red to create a sparkly snowy feel. And in our Christmas 2011 we used green, brown, and silver to create a woodsy/woodland theme. Today, we are sharing our Christmas 2012 decor. We used most of the decor from 2010 and 2011, but wanted to use more red in 2012. So, we changed out the stockings, tree skirt, and pillows, and then added more red to the mantle. I love the reindeer pillows. We're almost ready for Christmas!


This was our front porch.


When I saw this idea on Pinterest, I decided we needed to make one too.
Hailey and I made it together and she wanted to know what it said.
After I read to her what it said she answered, "Amen".

This was our front porch.

Thanks for visiting Our Family Inspired Home!
Wednesday, December 11, 2013
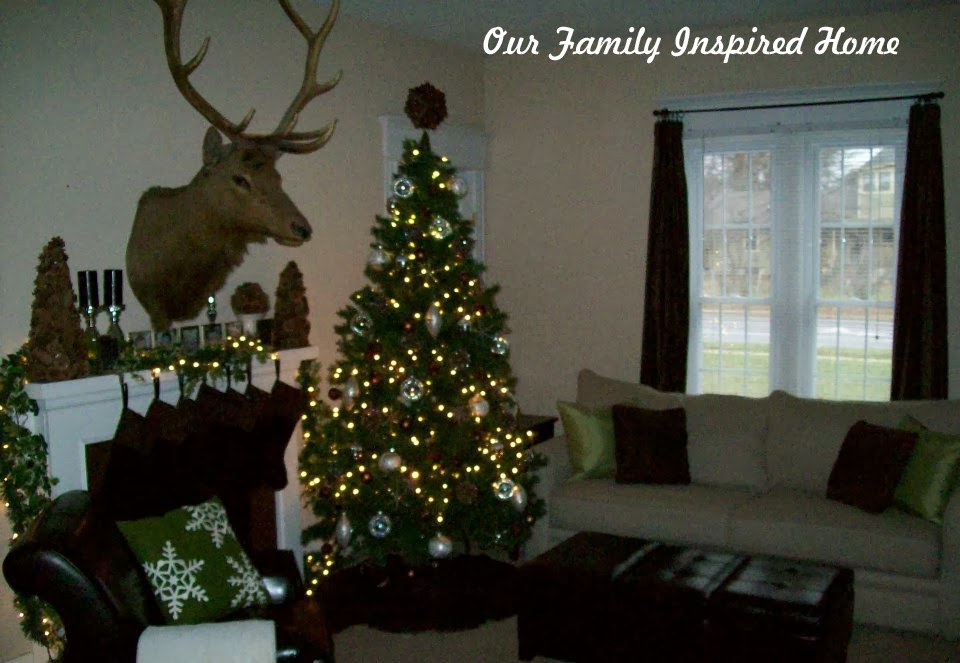
Christmas 2011
Hi everyone! Are you all ready for Christmas? We're still working on getting ready and still reminiscing as we go through our past Christmas pictures. Today we are sharing Christmas 2011. We changed it up from Christmas 2010 and went with a woodsy green, brown, and silver theme. Christmas 2010 we went with a white, silver, and red theme. We used all of the ornaments from Christmas 2010 and added more. We, also, kept the stocking holders. We changed out the pillows, throw, tree skirt and stockings, along with the decor on the mantle. This year (in our new home) we are using almost everything from 2011, in addition to some of the decor from 2010.


We will be back soon to share Christmas 2012!
Thanks for visiting Our Family Inspired Home!



We will be back soon to share Christmas 2012!
Thanks for visiting Our Family Inspired Home!
Monday, December 9, 2013
Christmas 2010
We hope everyone had a wonderful Thanksgiving! It's hard to believe that the Christmas season is upon us! As we get ready for Christmas in our new home, I thought it might be fun to look back at our past Christmas decor. And maybe, a little Christmas inspiration if you are looking for ideas this year. (For those of you who are new to our blog, we moved this past summer ( Exciting News! and Moving Days ). You may also like to read Our New Home ~ The Downstairs Before and Our New Home ~ The Upstairs Before. We still have a lot of worked to do, but you will have a better idea of the rooms I refer to in our new home.) This is our 2010 Christmas tree and mantle. We did a silver, red, and white theme. I love pillows and throws. I think they are the easiest way to warm up a room and I can reuse them year to year. I'm, also, able to reuse them for a different season or holiday, if I choose. These red and white check pillows and throw are on our side porch this year. We are using the ornaments, angel, and tree skirt on our dining room Christmas tree, this year.


We will be back later in the week to share our Christmas 2011.
I love the reminiscing that goes along with looking through old photos.
Thanks for visiting Our Family Inspired Home!
Tuesday, October 1, 2013
Side Porch Furniture
Finally, we have furniture set up on our side porch! Thank you for all your wonderful comments, we appreciate all of you! For those who are new to our blog you may like to read Cleaning Up The Left Side Yard, Side Porch Stenciled Planters, Rock Garden, Side Porch Inside Reveal, and Side Porch Outside Reveal And Rock Garden to catch up on where we started and how far we have come with our side porch. Thank you, so much, for your great suggestions for furniture on our side porch. But, we try to use what we have first before purchasing new. Although we had to reposition our porch furniture because our front porch on our other house was larger and shaped differently (Front Porch), we love the way our side porch on our new home has turned out and enjoy sitting out here.

Remember, this is where we started.


While taking pictures I wasn't sure I liked the two lanterns placed so close together,
so I switched the flowers and lantern next to the chairs. :)
Thanks for visiting Our Family Inspired Home!
Before And After
Our Home
Thursday, September 26, 2013
Side Porch Outside Reveal and Rock Garden!
The outside side porch reveal is ready, and included is a larger view of our rock garden! The reaction to our porch from the neighbors and community, along with last week's post of our inside porch reveal has been extraordinary. (If you missed our posts on our rock garden and porch, you may read about them here Rock Garden and Side Porch Inside Reveal). (You may, also, like to read about Cleaning Up The Left Side Yard). We have heard so many nice words to describe the work we have done on our side porch; such as, amazing, awesome, and, even, amazingly awesome! Thank you, we appreciate all of your kind words.


And this is how it looked after starting our clean-up.


 Chris painted the areas we couldn't reach.


Brice and I planted the bushes and flowers.
Then, Chris and Hailey built a retaining wall.

Brice and Chris repaired the porch stairs.


Lexie painted the trim.


The side porch and rock garden are beautiful!


Yep, amazingly awesome!
What a huge difference some clean up and paint can make!
Thanks for visiting Our Family Inspired Home!
Before And After

Just in case you missed it, this is where we started.


And this is how it looked after starting our clean-up.

Then, Lexie, Hailey, and I painted the porch.


We added lattice.


Brice and I planted the bushes and flowers.
Then, Chris and Hailey built a retaining wall.

Brice and Chris repaired the porch stairs.


Lexie painted the trim.


The side porch and rock garden are beautiful!


Yep, amazingly awesome!
What a huge difference some clean up and paint can make!
Thanks for visiting Our Family Inspired Home!
Before And After
Subscribe to:
Posts (Atom)